REST APIs Assignment and Project Help | What is Rest APIs ? Restful Services Using React Js and Node Js | Realcode4you
- realcode4you
- Apr 24, 2025
- 6 min read

Introduction
REST (Representational State Transfer) APIs are fast, reliable, and expandable solutions for creating accessible data on the web. Because of that, they are also the most popular kind of API. Most of the applications we made with ExpressJS relied on REST APIs.
This module will consolidate our knowledge and focus on good practices for building REST APIs. We’ll see examples of how REST principles were implemented in our current solutions and how they could improve.
In this lesson, we’ll focus on the simplest REST principles and use them in one of the previous applications we created. Looking at what we have learnt, we’ll focus on enhancing these concepts and implementing new functionalities in the next lessons.
REST Principles
REST, or Representational State Transfer, is an architectural style for designing APIs (Application Programming Interfaces). It is based on principles defining how the API should be designed and behave. These principles, known as the REST constraints, provide guidelines for creating RESTful APIs that are easy to use and maintain.
The main principles of REST are:
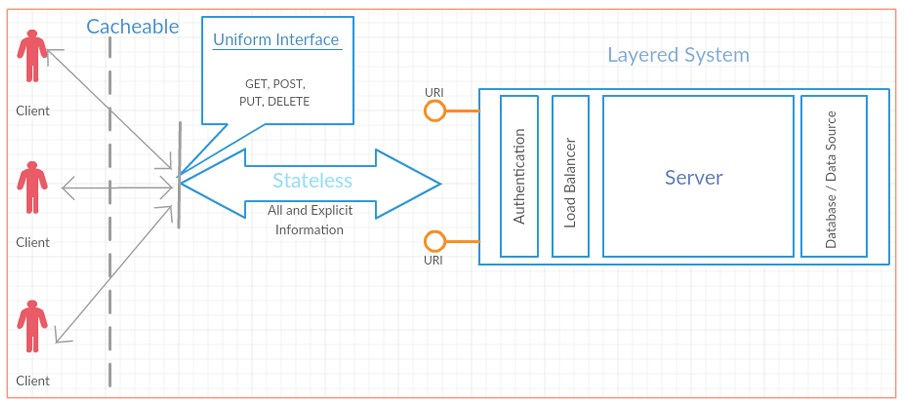
1. Uniform interface: The interface between the client and server should be uniform or consistent across all resources – for example, in most APIs:
Resources are represented as URLs (http://api.com/cars/123).
API resources should have the same type (JSON, XML, etc.).
The messages about resources should be self-describing, this is usually done using HTTP methods such as:
- GET
- POST
- PUT
- DELETE
It also involves using standard HTTP status codes to indicate the result of a request, such as:
200 OK – for a successful request.
301 Permanent Redirect – the requested page has moved to a new permanent URL.
302 Temporary Redirect – the redirection is temporarily redirected to another website.
304 Not Modified – the response has not been changed so that the client can resume the same cache in the future.
400 Bad Request – returned when the client requests a page and the server cannot understand anything.
401 Unauthorized – client does not have proper authentication to the request.
403 Forbidden – implies that the server understands the request but refuses to fulfil it.
404 Not Found – for a resource that does not exist.
500 Internal Server Error – requesting a URL is not fulfilled because the server encounters an unexpected condition.
501 Not Implemented – the server doesn’t support the functionality required to fulfil the request.
2. Client-server architecture: The client and server are separated in a REST API. The client is responsible for making requests to the server, and the server is responsible for responding to these requests. This separation allows for a more modular and scalable design, as the client and the server can be developed independently.
3. Statelessness: In a REST API, the server doesn’t store any information about the client’s state. This means the server doesn’t maintain session information or track the client’s actions. Instead, all information required to process a request is included in the request itself. This makes the API more scalable, as the server doesn’t need to maintain any state information.
4. Cacheability: A REST API should be designed to allow responses to be cached (stored in a quickly accessible, temporary storage location). This means the server should include caching headers in its responses to indicate whether a response can be cached and for how long. This helps reduce the server load, as the client can use a cached copy of the response instead of making a new request to the server. Most applications force caches to download the most updated files and content. However, these systems don’t always work correctly, so when we use the cache, we might risk using outdated data.
5. Layered system: A REST API can be composed of multiple layers, such as a load balancer, a web server, and a database server. These layers can be expanded or changed without affecting the API’s functionality – for example, while using ORM, we can easily replace MySQL database with the SQL Server database, which will not change how our API works. This allows for a more flexible and scalable design.
6. Code on demand (optional): A REST API can include the ability to send executable code, such as JavaScript, to the client. This allows the client to customise its behaviour based on the server’s response. However, this is not a mandatory part of REST and is only used in some instances.
We must choose a programming language and a web framework to implement a REST API. For JavaScript, the most popular combination is Node.js and Express – we used them in the previous courses. Once we have chosen our stack (the technologies we mentioned), we can start implementing the API by defining the endpoints and the HTTP methods each endpoint will support. For example, we might define an endpoint for creating a new user using the POST method. This endpoint might accept a JSON payload (the body of your request and response message) with the user’s details, such as their name and email address. Let’s see an example of the request’s JSON payload:
{
"name": "John Doe" "
email": "johndoe123@yahoo.com"
{
The server next validates the request and, if everything is valid - creates a new user in the database. Then, the server returns JSON payload in response, such as:
{
}
"status": "OK",
"data": {
"message": "User created"
}
In summary, REST is an architectural style for designing APIs based on principles such as client-server architecture, statelessness, cacheability, and layered systems. By following these principles, we can create a RESTful API that is easy to use and maintain.
Architecture of a RESTful application
We just looked at REST principles. Let’s check out how they are used to build RESTful application architecture:
Clients (in the case of JavaScript applications – usually user web browsers), while using applications, create the HTTP requests with cacheable headers (so far, we didn’t focus on request headers, we will go into detail over that in the next lessons). We use HTTP methods to create such requests and get the responses – with the GET method, we can access the client view, and with other methods, we can modify data on the server. We can use Postman to create requests and receive responses. Moreover, Postman enables us to test and document APIs as well.
After logging in, clients send their session data in the requests – in Express applications, we can access it by calling the req.user object (where req is the request parameter). Due to that, we can ensure the stateless rule – we don’t keep track on the server which client is logged in to which account.
Clients, after authentication, send proof of being the logged-in user in the requests. Thanks to that, our application is much more scalable. Applications could have thousands of users and be used by thousands of clients, keeping and updating the state of each client would be very expensive. The server load metric defines how many processes are waiting in the queue to access the server’s processor.
The value should be no higher than 10 – the smaller the value, the better. In summary, fewer requests sent from clients means our server load will be lower and perform better.
We also used the layered system principle in our Express applications. We used Passport authentication and SQL databases in our applications. However, these were implemented as separate components and then connected to the rest of the server logic. We could easily change the authentication strategy by changing our auth.js router file. Once the authentication was implemented, we could easily add it to various applications as well – the only difference between applications is the way the user data was stored and choosing which properties we wanted to keep in the user session.
Sequelize also enabled us to change our database engine by setting the dialect property in the configuration file. Our database logic was implemented in models and services. These services were later used in the router files – where we implemented the API endpoints.
This enables us to change the database engine and even completely change the used ORM. Switching to a different ORM would require us to change many files – we would need to reimplement all models and services. However, as long as models and services export the same logic – the rest of the server wouldn’t need any changes.
After all, in our router files, we only imported the services and used their methods to work with the database. From the server’s point of view, we don’t care how these methods are implemented. We only need them to work and return the correct data.
REST endpoints
In a REST API, an endpoint is a URL representing a specific resource or collection of resources. Endpoints are used to access the resources available on the server, and they can be accessed using HTTP methods such as GET, POST, PUT, and DELETE.
Example: Consider an API that exposes a resource for managing users. The API might have the following endpoints:
GET /users: Returns a list of all users.
GET /users/{id}: Returns the details of a specific user with the given ID.
POST /users: Creates a new user with the details provided in the request body.
PUT /users/{id}: Updates the user’s details with the given ID with the details provided in the request body.
DELETE /users/{id}: Deletes the user with the given ID.
Each endpoint is responsible for a specific task, such as retrieving a list of users or creating a new user. The API might also support additional endpoints for other tasks, such as searching for users or paginating the results.
Pagination splits results into pages, so we don’t need to read the entire table but only a small fragment (named page). We will learn more about this concept later in this course, for now – check the graphic pagination example below:


Comments